You notice it first in a moment that should have been perfect. The room is hushed, the lights are dimmed, and the opening scene of your favorite movie blooms across the TV. Then your eyes lock not on the story, but on the smudge—a pale, blurry fingerprint right in the middle of someone’s face. You lean closer. There’s dust along the edges too. A faint haze, a tiny scratch you hope is just a streak of dried cleaner. Suddenly, the magic of the screen feels… tired. It looks older than it really is, like a window that hasn’t been opened in a long while. You grab the nearest cloth—maybe an old T-shirt or, worse, a paper towel—and somewhere in the back of your mind a quiet voice whispers: “Please don’t ruin it.”
The Hidden Landscape on Your TV Screen
Most days, the TV is simply there—flat, glossy, glowing in the corner like a digital hearth. But up close, your screen is a landscape. Fine dust drifts in from open windows or sneaks in on your clothes. Tiny oil marks bloom from fingertips that have brushed the surface to point something out. Microscopic particles float in the air, settling into invisible layers that gently mute the brightness.
If you watch closely, you can sometimes see it: light catching on that veiled film when the TV is off. In morning sun, the screen looks almost cloudy. It’s the kind of thing our eyes learn to ignore, the way we overlook fingerprints on glass doors or a slight fog on a bathroom mirror. You still see the show just fine—until you don’t. Until the dark scenes seem muddier, the bright scenes less sharp, and you wonder, Has it always looked like this?
Modern TV screens are delicate. Beneath that shining, smooth surface is a careful arrangement of layers—anti-glare coatings, polarizers, and microscopic hardware that create the intense color and detail you love. That’s why the simplest act, cleaning, can either restore that magic or slowly wreck it with scratches and streaks. Many of us learned the hard way with older TVs that could handle a bit of rough treatment. Today, the reality is different: the right quick method can make your screen look like new; the wrong one can permanently dull it.
The Quiet Damage of Everyday “Quick Fixes”
Imagine your daily habits like a series of small, invisible nudges to your screen’s lifespan. You walk past with a damp kitchen cloth and swipe away dust. Maybe you reach for glass cleaner because that’s what fixes windows and mirrors. Paper towels feel satisfyingly sturdy, their rough texture promising to “really scrub it clean.” It feels efficient—until you lean in later and see swirls, faint scratching marks that catch the light just so.
Those harsh cloth fibers and strong chemicals don’t just clean; they strip. The protective coatings that keep reflections low and images crisp are thin, sensitive, and absolutely not friends with ammonia or alcohol. The damage creeps in quietly. A subtle cloudiness appears. Blacks lose their inky depth. Colors don’t quite pop. You might even blame the aging of the TV or the quality of the streaming service, never guessing the real culprit might be your last “good cleaning.”
The good news is that caring for a TV screen the right way is simple, fast, and strangely satisfying. It isn’t about buying expensive gadgets or learning complicated routines. It’s about a few ingredients, a bit of intention, and a method that respects what the screen actually is: a fragile surface built for light, not for scrubbing.
The One Rule That Changes Everything
Before we get into tools and steps, there is one simple rule that transforms the whole process:
If it works great on windows, counters, or mirrors, keep it away from your TV screen.
No glass cleaners. No all-purpose sprays. No vinegar mix. No rubbing alcohol—unless it’s diluted exactly right and used in very small amounts. And absolutely no paper towels or kitchen sponges. If it sounds like overkill, think of it this way: your screen is more like a camera lens than a window. You wouldn’t scrub your glasses with a dish sponge; your TV deserves the same respect.
Once you accept that, restoring that like-new glow becomes easier, not harder. You don’t need more stuff—you need less, used better.
Gathering the Gentle Tools
There’s a quiet pleasure in assembling a tiny cleaning kit for something you use nearly every day. Picture a small box or drawer where everything waits, ready for the next time dust starts to dull the picture. Here’s what belongs inside.
| Item | Purpose | Notes |
|---|---|---|
| Soft microfiber cloth | Dusting & polishing | Lint-free, for eyeglasses or screens; avoid fluffy fabrics. |
| Distilled water | Light cleaning | Avoid tap water to prevent streaks and mineral spots. |
| Mild screen-safe cleaner (optional) | Stubborn smudges | Check label says “for LED, OLED, LCD screens;” alcohol-free preferred. |
| Dry, clean hands | Handling cloth and frame | Oil from skin transfers easily to cloth and back to screen. |
| Optional: small blower or soft brush | Removing loose dust | Helps if you live in a particularly dusty home. |
The heart of this kit is the microfiber cloth. When you hold it between your fingers, it feels almost weightless, its fibers finer than a human hair. Those tiny threads are what make it magic: they trap particles gently instead of dragging them across the surface like sandpaper. You don’t need to buy the most expensive pack; you just need to keep a few separate cloths that are used only for screens.
The Quick, Effective Method (That Actually Works)
Now, the part you were really looking for: the step-by-step. From the moment you think, This screen looks gross to the moment you lean back and say, Wait, it actually looks brand new, this whole process can take under five minutes. No harsh chemicals, no complicated tools—just a small, repeated ritual that quietly extends the life of something you use almost every day.
Step 1: Turn everything off and let it cool.
Turn off the TV and, if it’s been running, give it a few minutes. When the screen is dark, dirt and streaks are far easier to see. A cool screen also reacts better to gentle cleaning—less evaporation, fewer streaks. You might be surprised how different the room feels in that moment of quiet, the black glass reflecting back your living room instead of a flood of images.
Step 2: Start dry.
Take your clean, dry microfiber cloth and fold it into quarters. This gives you multiple clean surfaces as you work. With the lightest possible pressure, begin wiping the screen in broad, horizontal or vertical strokes. Imagine you’re brushing dust off a photograph—barely touching, just enough to lift what’s there. The goal here is simple: remove any loose dust or particles before introducing moisture.
As you move, you may notice the dust leaving in swirling patterns, like mist clearing. Already, the screen begins to sharpen. Don’t worry about fingerprints or stuck-on smudges yet; this is the gentle first pass.
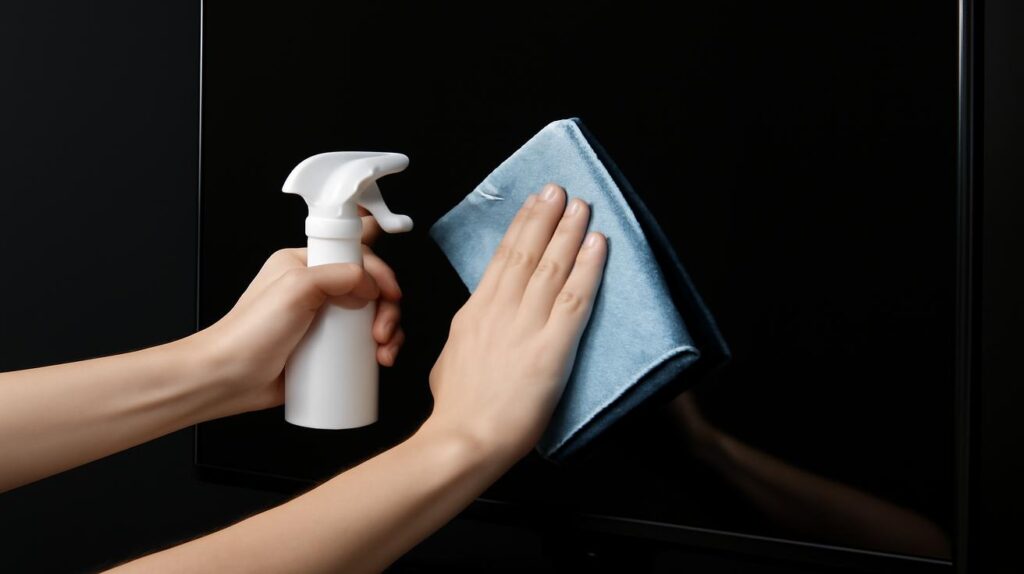
Step 3: Tackle the smudges—with moisture, not wetness.
This is where most people go wrong, and where the difference between “good enough” and “like new” is decided. Instead of spraying anything directly on the screen, lightly dampen a corner of your cloth with distilled water or a screen-safe cleaner. The cloth should feel just barely moist—not soaked, not dripping.
Now, locate the worst offenders: fingerprints, small oily patches, the mysterious streak that appeared after someone tried to “help” clean last time. With that damp section of cloth, gently work in small circles over each smudge, using only the slightest pressure. Resist any urge to scrub harder; let time, not force, do the work. You’ll often see the mark soften and then vanish, leaving a clearer patch behind.
Step 4: Follow with a dry polish.
Immediately switch to a dry, clean part of the cloth and lightly buff the area you just cleaned. This evens out any remaining moisture and prevents little halos or streak lines from forming as the liquid dries. This part feels almost like polishing a lens—the more patient and gentle you are, the more rewarding the result.
Step 5: Don’t forget the frame and back.
Once the screen itself is clear, your eye will start noticing dust along the bezel (the frame) and, if you peek behind, a soft gray fuzz clinging to vents and ports. Use the dry cloth or a soft brush to gently wipe the frame and back. Keeping these areas clean isn’t just about looks; it helps airflow around the TV, which can subtly extend its life and keep it running cooler and quieter.
When you’re done, step back. Turn the TV back on and let the screen wake up. Often the first moment after a real cleaning feels startling—blacks look deeper, whites cleaner, colors more precise. It’s like realizing you’d been watching the world through a slightly dirty window and didn’t know it.
Turning Cleaning Into a Small Ritual
There’s something unexpectedly calming about this tiny act of care. The TV, which usually blasts images and sound into the room, becomes a silent, passive surface for a few minutes. In the stillness, you notice the soft hum of the room—the whirr of a fan, the distant traffic, the gentle ticking of a wall clock. Cleaning the screen becomes less about chores and more about resetting a space that holds so much of your daily life: movie nights, game marathons, quiet documentaries watched alone late at night.
You don’t need to do this every day. In most homes, a light dusting once every week or two and a deeper, smudge-targeting clean once a month is enough. If you live with kids, pets, or near an open window, you might adjust that, but the goal remains the same: small, regular maintenance instead of emergency fixes when the screen looks terrible.
What matters most is consistency and gentleness. Over time, this routine becomes second nature. You start to notice early when dust is building up, before it dulls the picture. You catch the first small fingerprint before it becomes a cluster. And each time, the reward is immediate: that sharp, gleaming surface, ready to pull you back into the story instead of distracting you from it.
Little Habits That Keep Your Screen “New” Longer
Beyond the quick cleaning method itself, a few small shifts in daily behavior can keep your screen looking pristine for much longer. None of them require much effort; they’re more like gentle boundaries you set for a piece of technology that quietly serves you day after day.
Hands off the glass.
Make a simple house rule: no pointing at the screen with fingers. It sounds minor, but those light taps and traces are how most smudges start. Encourage a hand wave or pointing at the frame instead. Once everyone gets used to it, the screen stays cleaner much longer.
Control the light.
Dust loves strong light. If your TV sits near a bright window, sunlight can highlight every speck and streak. Consider sheer curtains or slight repositioning, not only to reduce reflections for your eyes but also to slow down how quickly dust builds on the surface.
Keep a cloth nearby.
Place a folded microfiber cloth in a drawer under the TV or in a small basket near your remote controls. When the tools for gentle cleaning are close at hand, you’re far more likely to do a 30-second wipe before a movie night instead of waiting until it looks noticeably bad.
Respect the coatings.
Remember that anti-glare coatings and delicate layers on OLED or LED screens are not easily replaced. Every time you choose a soft cloth over a rough towel, or distilled water over a harsh cleaner, you’re not just cleaning—you’re protecting fine surfaces that make modern picture quality possible.
When Your Screen Still Doesn’t Look Right
Sometimes you reach the end of your careful cleaning process, sit back, and feel a small knot of disappointment. You still see something. A faint blotch that won’t budge, a tiny scratch you hadn’t noticed before, a subtle patch of uneven brightness. It’s in that moment that cleaning and diagnostics start to overlap.
First, double-check in different lighting. Turn off the lights in the room and use the TV’s built-in test patterns if it has them, or open a completely white or completely black image. Some “marks” are actually reflections, or quirks of the panel that have nothing to do with dirt or residue. If the mark doesn’t change no matter how much you gently clean and polish, it may not be on the surface at all.
Small surface scratches, once there, are almost always permanent. The best you can do is soften their visibility by keeping the surrounding screen spotless. If a child has gone wild with a toy or something sharp brushed against the glass, no household cleaning method can fully erase real damage. That’s why the gentle routine matters: it greatly reduces the chance that the biggest culprit is your own cleaning habits.
But in many cases, what looks like “age” is actually just accumulation: layers of dust, old cleaner residue, or years of fingerprints and subtle smears. When you finally strip that away with patience and kindness, the result can feel like someone swapped in a new panel when you weren’t looking.
Seeing Your Screen as a Window Again
Once your TV is clean—truly, carefully clean—you notice other things too. Colors in nature shows feel more alive. Shadows in nighttime scenes hold fine detail that once disappeared in gray haze. Even the text in menus, crisp and sharp, feels easier on the eyes. The screen stops drawing attention to itself and goes back to being what it was always meant to be: a window, not a wall.
In that small transformation, there’s a larger truth. Our homes are full of surfaces that silently gather the world: dust from open windows, fingerprints from busy hands, the ghostly trace of daily life. Taking a few minutes to restore just one of them—the one that gathers so many stories, so much sound and color—can feel strangely grounding.
The quick method isn’t just about saving time. It’s about caring for something you count on, in a way that respects its nature. A turned-off screen, a quiet room, a soft cloth in your hand. Then, when the picture returns, it does so with the clarity and brilliance you paid for in the first place—like the day you first set it up, unboxed and perfect, waiting to light up the room.
FAQ
How often should I clean my TV screen?
Light dusting with a dry microfiber cloth every one to two weeks is usually enough. A more thorough clean for fingerprints and smudges once a month works well for most households.
Can I use regular glass cleaner on my TV?
No. Glass cleaners often contain ammonia or alcohol that can damage anti-glare coatings and dull the screen over time. Always avoid standard window or mirror cleaners.
Are paper towels safe for cleaning a TV screen?
No. Paper towels are surprisingly abrasive and can create fine scratches. Use a soft, lint-free microfiber cloth made specifically for screens or eyeglasses.
Is tap water okay to use?
Tap water can leave mineral deposits and streaks. Distilled water is safer and gives a clearer finish. If you must use tap water, use only a tiny amount and dry thoroughly afterward.
What should I do if a smudge won’t come off?
Try a slightly dampened microfiber cloth with distilled water and gentle circular motions, followed by a dry buff. If it still won’t budge, use a screen-safe cleaner labeled for TVs. Avoid increasing pressure; stubborn marks that don’t respond may be damage, not dirt.
Can I spray cleaner directly on the screen?
No. Spraying directly risks liquid seeping into the edges and damaging internal components. Always spray onto the cloth first, then wipe the screen with the dampened cloth.
Does this method work for all types of modern TVs?
Yes. This gentle method is safe for LED, OLED, QLED, LCD, and plasma screens. When in doubt, check your TV’s manual, but microfiber and distilled water are widely recommended across brands.
Why does my screen still look dull after cleaning?
If you’ve used harsh cleaners or abrasive cloths in the past, the coatings may already be damaged, which can’t be undone by cleaning. Going forward, stick to gentle methods to prevent further deterioration and keep the remaining clarity as long as possible.